


Passepoil
En octobre dernier, j'ai commencé ce patch, mais je l'ai mis de côté pour diverses raisons : petit-fils à naître, tricots à terminer, et manque d'inspiration. Le problème était un manque de "transition" entre les blocs du centre et la bordure. Jusqu'à ce qu'une de mes copines du groupe de patch m'a suggéré d'insérer une fine bande de rouge à l'emplacement problématique. De là, il n'y avait qu'un petit saut de puce pour me dire que c'était l'occasion d'apprendre à faire et à monter un passepoil qui donnerait un peu de texture en même temps au produit final!
Last October I began this quilt, but I set it aside for a few reasons: a grandson soon to be born, knitting to finish, and a lack of inspiration. The problem was the transition between the central blocks and the border, until one day one of my quilt-group buddies suggested inserting a thin band of red between the two zones. The lightbulb clicked - what a perfect opportunity to learn how to make and apply piping, something that would add some texture to the quilt top!
Mais je n'avais jamais fait, et encore moins posé, de passepoil sur un quilt. Qui plus est, le plus courant est de poser un passepoil entre la bordure et le biais, mais moi je souhaitais l'utiliser comme transition entre les blocs du centre et la bordure. Alors, je me suis renseignée. Ma soeur (qui utilise des passepoils depuis des années sur presque tous ses quilts) m'a donné quelques tuyaux et m'a recommandé les techniques de Susan Cleveland et de Philippa Naylor; ça tombait bien - j'avais déjà le livre de cette dernière!
But I'd never made or applied piping to a quilt. Furthermore, it's usually placed between the border and the binding, but I wanted to use it as a transition between the center and the border. So I started looking for help. My sister (who has used piping for years on nearly all her quilts) gave me a few tips and recommended Susan Cleveland's and Philippa Naylor's techniques; what luck - I already had the latter's book!
Première étape : confectionner le biais. J'ai coupé des bandes de 1 1/4 pouces que j'ai assemblées pour en faire une longue. Ensuite, avec un pied pour passepoil comme celui-ci... /First step: make the fabric strip. I cut 1 1/4-inch strips that I stitched together to make on long one. Then, with a piping foot like the one here...

(vous avez remarqué le tunnel sur le dessous du pied?), et ayant fait un noeud au bout du cordon pour pas qu'il se "sauve" à l'intérieur du tissu plié... / (did you notice the groove under the foot?), and having knotted the end of the cording so it wouldn't get pulled into the stitched fabric...

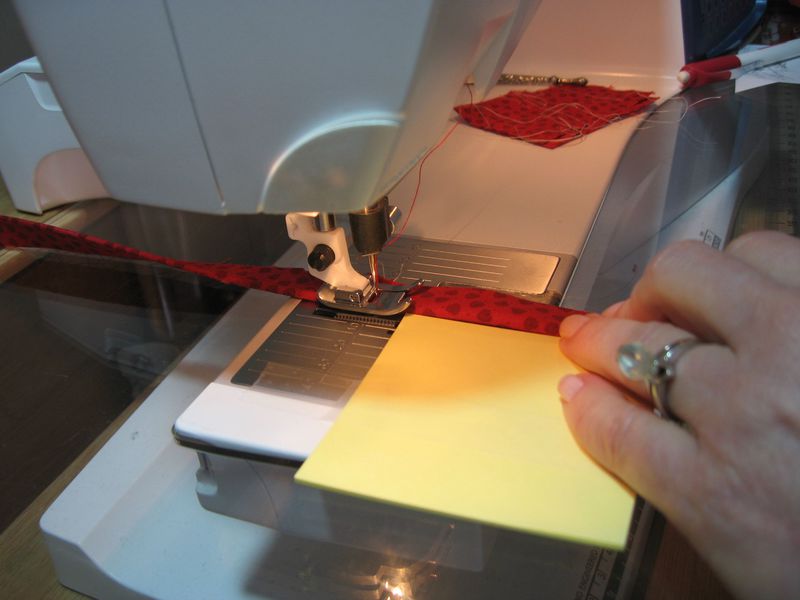
j'ai réglé l'aiguille de ma machine pour que l'aiguille passe juste à droite du cordon. Pour aider à maintenir le tissu dans l'axe, j'ai scotché plusieurs post-it sur la gauche. / I set my machine's needle so it would stitch just right of the cording. To help feed the fabric at the right angle, I taped a pile of post-it notes on the left.

Après, il a suffit de piquer en pliant le tissu autour du cordon. Il ne reste plus qu'à le monter sur mon quilt - je mettrai une photo ou deux quand ce sera fait. / Once that was done, I had only to stitch while holding the fabric folded around the cording. Now I can stitch the piping to my quilt top - I'll post a couple of photos when that's done.


/http%3A%2F%2Fstorage.canalblog.com%2F22%2F11%2F576244%2F87767386_o.jpg)
/http%3A%2F%2Fstorage.canalblog.com%2F18%2F99%2F576244%2F83725066_o.jpg)
/http%3A%2F%2Fstorage.canalblog.com%2F59%2F24%2F576244%2F69765604_o.jpg)
/http%3A%2F%2Fstorage.canalblog.com%2F25%2F22%2F576244%2F69241566_o.jpg)
/https%3A%2F%2Fprofilepics.canalblog.com%2Fprofilepics%2F4%2F9%2F493648.jpg)